Sunday, March 29, 2009

Shoo-Fly Pie


Back in the saddle again.

I love it when my pie crust turns out right. It's the most satisfying feeling. This is what it's supposed to look like before you add the liquids:


And in the pie pan:


Aaaaahhhh! Much better.

Shoo-fly pie holds a precious place in the Baker family (see, I'm part bona fide Baker!). My Great Grandpa Baker was Pennsylvania Dutch. And Shoo-Fly Pie is Pennsylvania Dutch "cuisine". One of Grandpa Baker's favorites. At our first Baker Family Reunion, in 1981, we had a Shoo-Fly Pie baking contest. Grandpa Baker was the judge. He was pretty picky about desserts. I don't have a picture of him testing the pies, but I do have this picture (my favorite of him)--


Edited (months later) to add--here's the picture of Grandpa Baker testing pies/waxing philosophical. I think his gesture is indicating that the crust should be just so. Or that the filling should be this thick. Or something. Thanks Auntie Vickie!


Hee hee. I love that guy.

The Pie Queen, who is not from the Baker line, warned me about making this pie. She said something like, "It's a sticky, treacly mess. You won't like it." (HA, "treacly", I kill myself...)

Apparently, there's no written version of the recipe to which Grandpa Baker compared all others. What we do have is his daughter Jane's recipe, which I altered a little.


Baker Family Shoo-Fly Pie *click here for printable version*
makes 1 9" pie

For the liquid part:
1/2 cup molasses
1/2 cup hot water
1/2 tsp. baking soda

For the crumb part:
1/4 cup cold butter
1 cup brown sugar
1-1/2 cups flour
1/4 tsp. salt
1 tsp. ground cinnamon
1/2 tsp. ground ginger
1/2 tsp. ground cloves
1/2 tsp. (heaping) freshly ground nutmeg

Stir liquid part together.

Combine dry ingredients and work in the butter to make crumbs.

Into an unbaked 9" pie shell, put crumbs and liquid in alternating layers with crumbs on bottom and top. Bake in 450 degree oven for 15 minutes. Reduce heat to 350 and bake for another 20 minutes.


I finally found organic brown sugar that packs. In fact, I think it packs better than regular brown sugar. I like it.


On this day, there was nothing to shoo away. The only thing flying was snowflakes (?!March 29!?).


At any rate, I've waited years to say it, and now I shall say it with gusto: MOM! YOU WERE WRONG! Phew. That may be the only time I ever get to say that. Felt good. We loved this pie. All of us. Even the kids. I added more spices than the original recipe called for. And I used butter in place of shortening. Is that the difference between yucky and yummy? Maybe. Served it with a little vanilla ice cream (although whipped cream would be just as good, if not better, atop this pie). It was like gingerbread pie. It's stick-to-your-ribs-y. Not a summer pie. With the snow outside it was almost like Christmas. Delicious.


TGIP Rating--Shoo-Fly Pie--KEEPER--Don't change a thing! Make it for Christmas Eve.

Next up: I'm going to see if I can get Mangled Dave to come over and teach me how to make Boozy Bread Pudding.

P.S. I hope you noticed the printable recipe link above. That's something new I added! I've also added it to previous blog posts where I posted recipes.

P.P.S. Bill, I have a project for you. You know those pie boxes that were on Pushing Daisies? With the sliding lids and the wire/handle system? That were deep enough to carry a pie with a high meringue? I need some.

Monday, March 23, 2009

Lemon Meringue Pie


Still learning. Apparently always will be. Is there anyone who can bake stuff the same way every time? Who doesn't have strange and unexpected occurrences in their baking process? Not me. It's always an adventure.

But, doesn't this look like Spring?


Pretty egg yolks.

So many things went wrong, I hardly know where to start. I'll start with the crust. It was almost a disaster this time. Just would not hold together from rolling surface to pie pan. I suspect my fats were too soft, because the dough came together very quickly, leaving me with hardly any of the water/egg white mixture in it. I think that little bit of egg white goes a long way to keeping the dough elastic and intact. So. Lesson learned. Put the fats back in the fridge for a bit if they've gotten too soft. Otherwise, even when you force the dough into a pie pan shape...


it might still crack and crumble in the cooking process...


guh.

I used Alton Brown's recipe. I had never tried it before. My memory wasn't failing me. I just had it in a file of things I wanted to try. But, considering the glaring error in the Bailey's cheesecake recipe I found online, I decided, maybe this time, I'd read some of the user comments. Many, many people said the filling was too runny. So. I made some adjustments. With apologies to Alton, because I worship him:


Lemon Meringue Pie *click here for printable version*

Lemon Filling:
4 egg yolks (reserve whites for meringue)
1/3 cup + 1 Tbls. packed cornstarch (it is possible to pack it like when you measure brown sugar)
1-1/2 cups water
1-1/3 cups sugar
1/4 tsp. salt
3 Tbls. butter
1/2 cup lemon juice
1 Tbls. finely grated lemon zest (plus more if you prefer a stronger taste)

1 (9-inch) pre-baked pie shell
1 recipe Meringue, recipe follows

Adjust the oven rack to the middle position. Preheat oven to 375 degrees.

Whisk egg yolks in medium size mixing bowl and set aside.

In a medium saucepan, combine cornstarch, water, sugar, and salt. Whisk to combine. Turn heat on medium and, stirring frequently (but gently), bring mixture to a boil. Boil for 2-3 minutes until mixture is thickened. Remove from heat and gradually, one spoonful at a time, add hot mixture to egg yolks and stir until you have added at least half of the mixture.

Return egg mixture to saucepan, bring back to boil while gently stirring, and boil for 2-3 minutes more. Remove from heat and gently stir in butter, lemon juice, and zest until well combined. Return to heat and bring to a boil again, for another 2-3 minutes. Mixture should be quite thick.


Pour mixture into pie shell and top with meringue while filling is still hot. Make sure meringue completely covers filling and that it goes right up to the edge of the crust.


Bake for 10 to 12 minutes or until meringue is golden. Remove from oven and cool on a wire rack. Make sure pie is cooled completely before slicing (recommended--cool for 1 hour or until room temperature, then for another 3 hours in the refrigerator).

Meringue Topping:
4 egg whites
1 pinch cream of tartar
1/2 tsp. vanilla
5 Tbls. sugar (adjust depending on how sweet you like your meringue--remembering that the filling of this pie is a little on the tart side)

Place egg whites and cream of tartar in the bowl of a stand mixer fitted with the whisk attachment. Beat egg whites until soft peaks form. Add vanilla, and then gradually add sugar and continue beating until stiff peaks form, approximately 1 to 2 minutes. Use to top lemon filling.


It's a lot of stirring. Truly. I have a whisking blister on my index finger. But patience pays off. The filling was perfect. Not runny at all. And not too sweet or gooey. I may have done something wrong with the meringue. I really wanted to be able to put it on the filling while the filling was hot, so the filling wouldn't have the opportunity to form any kind of skin. So I started it beating while I was stirring/heating the lemon mixture. I thought I would get it to the soft peak stage, get the lemon mixture done and in the pans, beat the meringue to stiff peaks and it would be ready to put on the pies immediately. But I think what I ended up doing was overbeating it. It tastes fine. And the texture is fine. But when it started to cool, drops of some kind of liquid started appearing on the surface of the meringue.


I wonder if it has something to do with the egg proteins seizing up and squeezing the liquid out (Alton would explain it much better than I just did). But I don't really know. The meringue didn't seem tough, so whatever was going on, it didn't effect much. I wish I could remember what the storied problems are that people have with Lemon Meringue Pie. The ones that Alton so expertly solved with his recipe, on his show. But I haven't seen that episode in ages. I would love to have watched it for reference. **Psst...Alton...put episodes of your show on iTunes...I'd seriously pay for them.**

All in all, the pie turned out great. In spite of the crust fiasco. In spite of whatever was going on with the meringue. In spite of my whisking blister. The crust held together for cutting and serving and had a great texture and delicious taste (if there's one thing I've learned in this process, it's how to save an almost-failed crust). The filling was tart and light. And the meringue added a little sweetness and airy texture to the filling.

TGIP Rating--Lemon Meringue Pie--KEEPER--but you probably won't have many opportunities to make it as mr. is not generally a fan of Lemon Meringue Pie.

Next up: For some reason Seconda wants me to try my hand at Shoo-Fly Pie. So I shall. Need to get see if I can wrestle my Great Grandmother's recipe from somebody this week.

Wednesday, March 18, 2009

Midweek Kitchen Confessions 12: Space Case


#1 Pi Day came and went without my notice. I did not make a pie to celebrate. I was busy making a cheesecake and celebrating St. Patrick's Day early. Which leads me to...

#2 I found myself behind the 8-ball on St. Patrick's Day. Didn't have a plan--for dinner or dessert. Resorted to boiling Bratwurst in Murphy's Stout, grilling them, serving them with potato chips (gotta get the potatoes in there somewhere), and washing the whole thing down with more stout (frankly, I prefer Guinness to Murphy's). And for dessert? I bought a chocolate cake from the grocery store that had shamrock shaped sprinkles on it. *shame*

#3 Next year I vow to do better on both counts.

Bonus for you: in case you haven't clicked, the link above for Guinness is to a commercial on youtube that makes me giggle.

Tuesday, March 17, 2009

Guest Blog: The Priestess's Irish Car Bomb Cupcakes


The name of the cocktail that inspired these is so very not-PC. But whatev. There's nothing about The Priestess that is politically correct. Which is why I love her. Enjoy her and her recipe that incorporates three of my favorite kinds of booze (although I'm partial to Bushmills. Stop throwing things!).


A few years back, my theatre company, Impact Theatre (http://impacttheatre.com/), had a kickass Technical Director, Alain Jourdenais. He was fantastic, and we adored him. It was on an Impact Theatre annual season planning retreat that he introduced everyone to the Irish Car Bomb. This was so far back he had to tell the bartender in the Reno Hilton how to make them. Alain eventually left Impact to go to CalArts for lighting design. In October 2007, days before our first Full Houses Poker Tournament Benefit, we got the tragic news that Alain had died as a result of a car accident. He was 26. These are the cupcakes I created in his honor. I brought them to the benefit and they were a huge hit. They've been in my repertoire ever since.

They're labor-intensive, but pretty awesome.


Alain's Irish Car Bomb Cupcakes *click here for printable version*

First, make Guinness Cupcakes:

1 cup (2 sticks) unsalted butter, room temperature
2 cups granulated sugar
4 eggs
2 and 3/4 cups all-purpose flour
1 and 1/2 teaspoons baking powder
1/8 teaspoon salt
3/4 cup Guinness Extra Stout, room temperature
1/4 cup heavy whipping cream

1. Preheat your oven to 350.
2. Beat butter on high until creamy, about 30 seconds. I recommend a Kitchen Aid for the mixing involved in this entire recipe, but I use a hand mixer. I learned how to bake using vintage cookbooks, my wits, and my mom's kitchen when I was 12. She didn't own a Kitchen Aid and I wasn't allowed to use the hand mixer. Therefore, I mixed everything with a wooden spoon or a fork. Now I can't bake anything unless I know how it feels, and a hand mixer is, in and of itself, a bit of a compromise. People who can successfully use a Kitchen Aid and know what's going on with their dough by the look of it mystify and amaze me. If you're one of those, mazel tov. For me, I have to feel it, and I'm stuck with the pain-in-the-assery of the hand mixer for this recipe.


3. Add sugar. Beat on medium-high until light and fluffy, maybe 2 or 3 minutes.
4. Add eggs one at a time, beat to incorporate between each.
5. Sift flour, baking powder, and salt together into a separate bowl.
6. Pour Guinness and cream together into a large cup or spouted pyrex measuring cup. DO NOT DRINK. I know it's hard. You can drink the rest of the bottle, though.


7. Add about a fourth of the flour to the butter/sugar mixture and beat to combine.
8. Add about one third the Guinness/cream mixture and beat until combined. Don't be half-assed about the beating or add too much at a time or your mixture will look all curdled and weird.


9. Repeat above, alternating flour and Guinness and ending with the flour mixture.
10. Fill your cupcake papers 3/4 full.
11. Bake for approximately 24 minutes. Start checking them at 22 to see where you oven lands with this. I'd say anywhere from 22 - 25 is likely.
12. Let your cupcakes cool completely.

Now, make your Jameson's Pastry Cream:

1 and 1/4 cups whole milk
3 large egg yolks
1/4 cup granulated sugar
1/8 cup all-purpose flour
1/8 c cornstarch (scant)
3 and 1/2 TB Jameson's Irish Whiskey

1. Mix sugar and egg yolks together with a wooden spoon in a pyrex or stainless steel bowl.
2. Sift the flour and cornstarch into the egg mixture and mix until it's smooth and pasty.
3. Heat the milk over medium in a saucepan until it boils. When it foams up, remove it from the heat and add it really slowly to the egg mixture, whisking constantly to prevent curdling.
4. Once it's all whisked together, put it all into the saucepan and cook over medium, whisking constantly, until it magically turns into pastry cream. This takes about 30 seconds and is heralded by the arrival of a thick, creamy texture.
5. Remove from heat, let cool for a bit, and whisk in the Jameson's.

Now Fill Your Cupcakes!

Use the cone method to fill your Guinness cupcakes with the pastry cream:

1. Take a completely cooled cupcake and cut a cone-shaped wedge out of the center.
2. Fill the hole with your pastry cream.


3. Cut the bottom off of the cupcake cone and replace the top like a little hat.
4. Repeat until all cupcakes are filled. Your husband, roommates, or assorted neighborhood hobos will eat the cupcake scraps. TRUST.

Finally, make your Bailey's Frosting. It's so simple, even a child could do it. Make Mommy some boozy frosting! Awesome.

Bailey's Frosting:

1 cup (2 sticks) of butter
2 boxes (2 lbs) powdered sugar
1/2 - 3/4 cup Bailey's Irish Cream

1. Melt the butter in a large bowl in the microwave.
2. Add the powdered sugar and 1/2 cup of the Bailey's and mix on medium high to high until incorporated.
3. Add more Bailey's in 1 TB increments until the desired consistency is reached.
4. Frost your cupcakes! A generous amount of frosting is both friendly and perfect for hiding the filling surgery you did earlier.

You'll want to eat these cupcakes the day you make them. Luckily, so will everyone else!

Have a great St. Patrick's Day, everyone, and raise a glass to Alain while you're at it.


Next up: Spring is in the air and I'm ready for something fresh tasting. I've seen the episode where he makes it and apparently I've tried the recipe myself, but I have no memory of it: I'm making Alton Brown's Lemon Meringue Pie.

Sunday, March 15, 2009

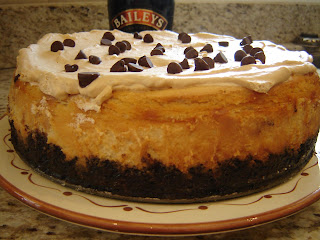
Bailey's Irish Cream Chocolate Chip Cheesecake

That's a mouthful isn't it?! I assure you, however, it's a delicious mouthful.


I've made this cheesecake before, many times. With a different crust. You can choose which crust you like better. Or try both. Or make some kind of combination of the two. And honestly, it's ridiculously yummy and rich with any crust. You can use this recipe (I'd advise that you replace the 2 tablespoons butter in the coffee cream with 2 tablespoons sugar--I'm pretty sure it's an error in the recipe) or you can use this one (everything is exactly the same except the crust):

Bailey's Irish Cream Chocolate Chip Cheesecake
*click here for printable version*


Crust:
2 cups graham cracker crumbs
1/4 cup sugar
6 tablespoons butter, melted

Filling:
2-1/4 pounds cream cheese, room temperature
1-2/3 cups sugar
5 eggs, room temperature
1 cup Bailey's Irish Cream (For the love of all that is holy, don't use Carolan's. Just don't.)
1 tablespoon vanilla extract
1 cup semisweet chocolate chips

Coffee Cream:
1 cup chilled whipping cream
2 tablespoons sugar
1 teaspoon instant coffee powder
chocolate curls (or more semisweet chips) as garnish

For Crust:
Preheat oven to 325. Coat a 9-inch springform pan with vegetable cooking spray. Combine crumbs and sugar in pan. Stir in butter. Press mixture into bottom and 1 inch up the sides of the pan. Bake until light brown, usually about 7 minutes. Maintain oven temperature at 325.

For Filling:
Beat cream cheese with an electric mixer until smooth. Gradually add sugar, then eggs one at a time, then Bailey's and finally the vanilla. Sprinkle half of the chocolate chips over crust. Spoon in filling. Sprinkle with remaining chocolate chips.


Bake until cake is puffed, springy in the center and golden brown, about 1 hour & 20 minutes. Cool cake completely in refrigerator.

For Cream:
Beat cream, sugar and coffee powder until peaks form. Spread mixture over cooled cake. Garnish with chocolate curls.


Obviously, at some point before serving, you need to remove the outer ring from the springform pan, but you'll need to leave the cheesecake on the bottom piece of the pan for serving, or it will become kind of a mess.

I will admit, I take the easy way out, (following the directions here) and use an electric mixer.


Tita Rax, who knows waaayyy more about cheesecakes than I do, says that in order for it to be authentically dense, it has to be mixed by hand. Honestly, I've done that and it's just too much manual labor for me. If you decide to take that road, you should know that you will need to cook the cheesecake for a little longer than the time given above.

As many times as I've made this, the whole cheesecake thing gives me fits every time.


See that big crack down the middle? It's moist in there. And I'm never sure whether it's just the right amount of moisture, or if it's the undone brand of moisture. So, I always end up nervously cooking it for anywhere from 5 to 20 minutes longer than the recipe indicates. But, really, it's cheesecake with Bailey's in it. Undercooked--overcooked--who cares? Yum.

TGIP Rating--Bailey's Irish Cream Chocolate Chip Cheesecake--KEEPER--duh!

Next up: I made this for a St. Patrick's Day party, but a much more fabulous St. Patrick's Day treat awaits you on the actual day. The Priestess, who performed my marriage ceremony, guest blogs. I can't wait!

Wednesday, March 11, 2009

Midweek Kitchen Confessions 11: Home SWEET Home

#1 I unpacked my kitchen first. That's just the way things work for me.


A home is not operational until the kitchen is organized. I still have a few things to do: finding storage for dinnerware that is not frequently used, filling my pantry and fridge with foodstuffs, and getting rid of the flotsam that has landed on my baking counter.


Yes, that's what that peninsula is now called.

#2 After only two nights in our new home, I had to bake. I couldn't take it anymore. I used the smell of brownies to drive away the unfamiliar smells and the DNA of previous occupants still floating in the air. Last week, I scrubbed every surface I could get my hands on. This was my way of scrubbing the air.


#3 My first mess in my beautiful new kitchen.

Sunday, March 8, 2009

Guest Blog-The Pie Queen's Apple Strudel


Apple Strudel may not be quite as American as Apple Pie, but it certainly tops the charts in Hungary and Vienna where it was perfected and made famous. Its origins can be traced clear back to the Greeks that first perfected the technique of making the thin dough for Baklava. They named it Phyllo which means 'leaf'.

I can't think of very many things that are more pleasing to the palate than a thinly sliced tart apple baked in the flakiest, most delicate substance on earth - Phyllo sheets - with a bit of sweetness and spice added. It makes a divine looking presentation and even more divine epicurean experience. This is the dessert of your dreams - a lowfat version of the traditional strudel pastry and a great alternative to traditional apple pie. Dare I say it is as 'easy as pie'…maybe even easier? And, exercising my rights as 'guest blogger' and resident daredevil - I now stray bravely away - just for today - from the world of pie into the delicate, mouth-watering and WOULD YOU BELIEVE HEALTHY world of Apple Strudel! Just think - no trans-fats and no cholesterol! Unless of course you consider the little matter of the smidgy of cholesterol in the butter…

If you've never tried using the paper thin Phyllo sheets you are in for a revelatory experience. Here's where I make good the 'easier than pie' part I promised. The most perfect dough possible, flaky-thin, tender, ready-made, ready to use and found in the freezer section of most super markets. Thaw the package overnight in your refrigerator or it will thaw at room temperature in about 2 hours. It may be stored in your refrigerator for up to 4 weeks. Most boxes of Phyllo contain two sealed packages for use with two or more recipes. This recipe takes only 6 sheets and there are usually two packages of 20 sheets in each box. A little goes a long way and it can be kept on hand in the freezer for weeks if not months.

NOTE: Do not open the Phyllo dough until all of your ingredients have been assembled and you are ready to work with it. When first opened it is sufficiently moist to maintain flexibility but due to its delicate nature it begins to dry out and become brittle rather quickly when exposed to the air. It helps to cover the unused sheets with a slightly damp tea towel or sheet of plastic wrap while you are working with it.

Having gotten this lengthy preamble out of the way…and hopefully heightened your anticipation in the process…here is the long-awaited recipe:


Apple Strudel - Serves 6 *click here for printable version*

[Just for the record T is pronounced 'tablespoon' and tsp is pronounced 'tisp']

2 large Granny Smith apples peeled, quartered, cored and sliced into small, moderately thin slices

3 T packed brown sugar

1 T fresh lemon juice

1/2 tsp cinnamon

1/2 tsp nutmeg

6 Phyllo sheets

5 T unsalted butter, melted (if you only have salted butter on hand it works just as well but increases the sodium content)

1 T confectioners' (powdered) sugar

Preheat oven to 350°

In a large mixing bowl, combine sliced apples, brown sugar, lemon juice and spices. Stir until well combined. Lay 2 sheets of Phyllo dough directly on top of one another on a parchment covered baking sheet that has sides. Using a pastry brush, brush the Phyllo sheet on top with 1/3 of the melted butter.

Lay 2 more sheets on top and brush the top sheet again with half of the remaining melted butter. Place the final 2 sheets on top and then spread the apple mixture over half of the Phyllo, leaving a 1" border on the three sides.

Starting from the long side, roll up the strudel, pressing the ends together. Place the roll, seam side down.

Brush the top with the remaining melted butter. Bake until the top is golden and crisp and the apples are bubbly, approx 35 minutes. Remove from the oven and allow to cool for 5 minutes before transferring from the parchment paper to a serving platter. Sift confectioners' sugar over the top. As I always say, "You can cover up a world of sin with confectioners' sugar." After the strudel is sufficiently cool, cut into slices for serving. Serve warm or cool.


Calories 91

Protein 1g

Carbohydrates 17g

Total Fat 3g

Saturated Fat 1g

Cholesterol 5mg

Sodium 48 mg

Dietary Fiber 1g

It was just hubby and I tonight. Unfortunately hubby did not want to share this with me since he's planning on being pencil thin by year's end. The resident blogger is away…so that left it pretty much up to me. Let's see - I've had one serving as the official taste tester and just to let you know - it lived up to all of its campaign promises. All of them. What could be more American than that? Now. Nobody's looking, I'm the only one up and there are five servings left…well, I am the Pie Queen am I not?

Commentary from April:

Photos were taken by The Pie King. Note to self: hire him as your blog photog, he's much better at that than you are.

As you might imagine, the strudel was delicious. 91 calories?! T'ain't nothin'!

TGIP Rating--Apple Strudel--KEEPER--Note to self: bake this yourself some time. Remember how you haven't worked with Phyllo dough? That needs to be amended.

Next up: I fall back on a favorite to celebrate St. Patrick's Day--Bailey's Chocolate Chip Cheesecake.

Sunday, March 1, 2009

Deli-Style Rye Bread


Mary: Bread... that this house may never know hunger.
[Mary hands a loaf of bread to Mrs. Martini]
Mary: Salt... that life may always have flavor.
[Mary hands a box of salt to Mrs. Martini]
George Bailey: And wine... that joy and prosperity may reign forever. Enter the Martini Castle.
[George hands Mr. Martini a bottle of wine]


I got this recipe from my December sister. I have no idea where she got it, so I'm just going to go ahead and give to you. I call it Plagiarizing it Forward.


Deli-Style Rye Bread *click here for printable version*

Makes 1 large or 2 smaller loaves

Sponge:
2/3 cup rye flakes (optional--and I didn't use)
2-3/4 cups water
1-1/2 tsp dry active yeast
2 Tbsp honey
3 cups unbleached all-purpose flour (or bread flour)

Rye Bread:
1-1/2 cups unbleached all-purpose flour (or bread flour)
3-1/2 cups rye flour (I used dark, but medium or light would work just as well)
2 Tbsp caraway seeds
2 Tbsp vegetable oil
1 Tbsp table salt
Cornmeal for sprinkling

Glaze:
1 egg white
1 Tbsp milk

1. For the sponge: heat oven to 350 degrees; toast rye flakes on small baking sheet until fragrant and golden brown, about 10-12 minutes. Cool to room temperature. Mix water, yeast, honey, rye flakes and flour in the large mixing bowl of a heavy duty mixer to form batter.


Cover with plastic wrap, and let sit until bubbles form over the entire surface, at least 2-1/2 hours. (Can stand at room temperature overnight.)

2. For the bread: Stir all-purpose flour, 3-1/4 cups rye flour, caraway seeds, oil and salt into the sponge.


With machine fitted with dough hook and set on speed 2, knead dough, adding remaining 1/4 cup rye flour once the dough becomes cohesive; knead until smooth yet sticky, about 5 minutes.


With moistened hands, transfer dough to a well-floured counter, knead it into a smooth ball, then place in a lightly greased bowl.


Cover with plastic wrap and let rise at room temperature until doubled in size, 1-1/4 to 2 hours.


3. Generously sprinkle cornmeal on a large baking sheet. Turn dough onto a lightly floured surface and press dough into a 12x9 rectangle. (For 2 smaller loaves, halve the dough, pressing each portion into a 9x6 1/2-inch rectangle.) With one of the long sides facing you, roll dough into a 12 inch (or 9 inch) log, seam side up. Pinch seam with fingertips to seal. Turn dough seam side down, and with fingertips, seal ends by tucking dough into the loaf.


Carefully transfer shaped loaf (or loaves) to prepared baking sheet, cover loosely with greased plastic wrap, and let proof until dough looks bloated and dimply, and starts to spread out, 60-75 minutes. Adjust oven rack to lower center position and heat oven to 425 degrees.

4. For the glaze: Whisk egg white and milk together and brush over sides and top of loaf (loaves). Make 6 or 7 slashes, 1/2 inch deep on dough top with serrated knife or single edge razor blade. Bake for 15 minutes, then lower oven temperature to 400 degrees and bake until golden brown and an instant-read thermometer inserted in center of loaf registers 200 degrees, 15-20 minutes for small loaves and 25-30 for larger loaf. Transfer to a wire rack and cool to room temperature. Slice and serve.


As I think I've confessed before, I am no bread expert. Far from it. But I realized while making this bread, that most of the time when I make bread I'm in a big fat hurry to get it done in time for dinner. Which may account for some of my frustrations and missteps with the process. This time it was different. I don't know if that's because this recipe is easy, or if it's because I gave myself more time to prepare it and wasn't working under a "deadline". But really, I was surprised at how easy it was and how nicely it turned out.

I was a little skeptical about using the mixer with the dough hook. My own dough hook is as yet unused. But it worked really well. And "with moistened hands" took me aback as well. But, yet again, it worked perfectly. I got the machine-kneaded dough out of the bowl and off the hook (HA!) and onto my kneading surface without covering my hands with it. I've also never tested the temperature of my bread to check its doneness. Again, I did it and it was perfect.

It's not as high of a loaf as I would like to have (you know, for pastrami sandwiches), but maybe if I use bread flour the next time, it will be a little puffier. It was, I humbly submit to you, perfect as breakfast toast (with butter).


I chose this recipe this week because of the quote at the top. As we move into our new home starting this coming week, those are all things we deeply wish for: food at our table, spice in our lives, joy and prosperity. But why rye bread, you ask? Well, because I've never made it before. And because it reminds us of a deli that we loved in a place that I still think of as home.

TGIP Rating--Deli-Style Rye Bread--KEEPER--Try with bread flour. And see if you can find rye flakes. I can't help but wonder how/if they would change the taste and texture.

Next up: The move catches up with me. I leave you in the capable guest-blogging hands of the Pie Queen.

P.S. to my December sister: I think it is the rye flour that makes the bread seem not so smooth. The flour itself has a lot of texture to it.